Showing posts with label dessert. Show all posts

Saturday, December 17, 2016

Nutmeg Sour Cream Drops


These cookies bring back memories of my grandmother. She loved to bake and cook and almost always had some type of cookies on hand in case anyone stopped by to visit. She often made these in the winter months, and I remember eating these many times over the years when visiting her. The cookies are not hard to make but icing of the cookies and putting on the nut topping takes some extra time. However, the extra work is worth it because the icing and little bit of nuts on top just take these little gems over the top. They are perfect for a special gathering or just to have with some tea or coffee. If you keep them in a sealed container, they will keep for quite some time or you can freeze them and thaw later if you need some sweets on hand.

Ingredients:

  • 2 1/2 cups flour
  • 1 tsp baking soda
  • 1/2 tsp baking powder
  • 1/4 tsp salt
  • 1/4-1/2 tsp nutmeg (I used 1/2 tsp of nutmeg and did not think it was too strong)
  • 1 1/2 packed brown sugar
  • 3/4 cup shortening or butter (I used butter)
  • 2 slightly beaten eggs
  • 1 tsp lemon peel
  • 1 tbsp lemon juice
  • 2/3 cup sour cream
  • 2/3 cup chopped walnuts
Browned Butter Frosting:
  • 3 tbsp butter
  • 2 cups confectioner's sugar (10x)
  • 2 tbsp milk
  • 1 tsp vanilla
Directions:
  • Sift your dry ingredients together in a medium bowl
  • In a large bowl, cream together the butter or shortening and sugar, then add in the eggs
  • Mix the dry ingredients into the wet mixture and add in the lemon peel, lemon juice and sour cream
  • Drop by rounded teaspoons onto greased cookie sheet 2 inches apart. 
  • Bake at 375 degrees F for 8-10 minutes or until edges are slightly browned.
  • Cool on a rack
  • Prepare browned butter frosting as follows- Melt the butter in a medium saucepan and stir until brown.
  • Remove from heat and slowly beat in sifted confectioner's sugar (10x), milk and vanilla.
  • Spread frosting immediately while still warm on the cookies
  • Sprinkle the chopped nuts over the top of the cookies while the frosting is still warm


Sunday, August 24, 2014

Zucchini Pineapple Bread with Pineapple Glaze


Here is yet another favorite zucchini recipe. I grew up eating (and still love) spiced zucchini bread with pineapple and sometimes raisins or dates in it, but I love the simplicity of this recipe. It is so moist, like most other zucchini recipes, but the pineapple really shines through in this sweet bread. The pineapple glaze also adds another pop of pineapple flavor that is just perfect! This bread is best a day or two after being baked (if you can keep it hidden that long)- store in a plastic bag and then glaze it an hour or more before serving, allowing the glaze to dry some and not be so sticky. The other thing I love about this recipe is that it makes 2 loaves- and you will find that both are eaten so quickly that you will be glad you made 2 loaves since nobody is going to stop at one slice! 

Makes 2 loaves - about 20 servings
Ingredients:
  • 4 eggs
  • 1 3/4 cups sugar
  • 2 tsp vanilla
  • 1 cup oil (coconut oil is great)
  • 3 cups flour (I used ½ white wheat flour and ½ all purpose flour)
  • 1 tsp baking powder
  • 3/4 tsp baking soda
  • 1 15 oz. can of crushed pineapple, juice drained and reserved
  • ¾ - 1 cup chopped walnuts
  • 2 cups shredded zucchini (I peeled mine)- seeds also removed if large
  • ¾ cup confectioner's sugar, sifted
  • 2 Tbsp pineapple juice


Directions:
  • Preheat oven to 350 deg F. Grease and flour 2 bread loaf pans; set aside.
  • In a medium bowl, sift together dry ingredients. 
  • In a large bowl, whisk together eggs, sugar, vanilla and oil- or use mixer on low until combined, then increase to medium speed for 1 minute.
  • Add in pineapple, zucchini and nuts and mix together until completely combined.
  • Gradually add in dry ingredients.
  • Divide half of batter between the 2 prepared bread loaf pans. Drop pan on hard surface a few times to even out the batter and help bubbles come to the top. 
  • Bake in preheated oven for 55-60 minutes or until toothpick inserted in center of bread comes out clean. 
  • Cool breads in pans on cooling racks for about 10 minutes, then carefully turn out onto cooling rack to finish cooling.
  • To prepare the glaze, sift the powdered sugar into a medium bowl. Add in reserved pineapple juice, adding the juice gradually, 1 tablespoon first and then 1 teaspoon at a time. If you want the glaze firmer to stay on top of the bread more, do not add as much liquid. Combine well and pour part of glaze over top of the cooled loaves and wait about 10 minutes for the glaze to thicken some. After glaze has dried a little on the bread, add any remaining glaze to add another layer, also scooping up any glaze that has drizzled down over the sides. This will be thicker and can be spread over top of the loaves again. Let loaves set until glaze is not sticky wet. Slice and serve or store in a covered container (if putting in a bag or covering with plastic wrap, the glaze will soften and stick to the plastic). I wait to apply the glaze until before serving as it becomes very wet and sticky in the bag/storage container.
*If you desire to make it a piƱa colada sweet bread- add ½- ¾ cup of sweetened shredded coconut into your batter with the shredded zucchini, but the coconut will make the loaf a little more dry. So adding a couple Tbsp's of pineapple juice may help the loaf still be moist. Otherwise, remove the loaf from the oven immediately- may be finished sooner.


**This bread is wonderful frozen and later thawed, glazed and served.


Friday, August 15, 2014

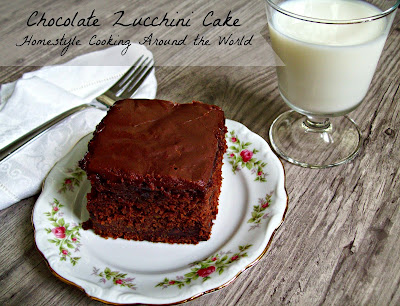
Chocolate Zucchini Cake


While I am not a chocolate cake fan (I like cakes with fruit and other add-in's), this cake has changed my mind. It has a moist and fudgey consistency, unlike many chocolate cakes that I find are more dry and lacking in flavor. Of course, the moisture comes from the zucchini that totally disappears in the cake, especially if you peel it before shredding it. What sets this recipe apart from other chocolate zucchini cakes is that is uses more zucchini and includes vanilla and cinnamon, which adds something special to round out the chocolate flavor. 

I found that 4 cups of shredded zucchini equals about 1 large zucchini or 3/4 of a super-large one, minus the center pulp area with the seeds. If you are using smaller zucchini, you probably do not need to remove the seeds unless they are large. Since we are often finding those big zucchinis that have somehow been missed until they are enormous, this is just about the tastiest way to use up one of those over-sized veggies. There have been a couple people that tell me adamantly that they do NOT like zucchini, but when they tried this cake (through a little deception) they were amazed that something this good would have THAT in there-- and even went back for more. (I just love tricking people into eating veggies that they thought they didn't like!)

Ingredients:
  • 2 1/2 cups flour
  • 1 3/4 cups sugar
  • 1/2 cup unsweetened cocoa
  • 1 1/2 tsp baking soda
  • 1 1/2 tsp baking powder
  • 1/2 tsp salt
  • 1 tsp cinnamon
  • 4 eggs
  • 1 cup oil
  • 1/2 cup buttermilk
  • 1 tsp vanilla
  • 4 cups peeled, grated zucchini (I let the zucchini drain in a colander while preparing the cake but did not press the liquid out of it.)
  • 3/4 cup chopped nuts (optional)
  • 3/4-1 cup semi sweet chocolate chips (about 1/2 of 11 oz bag)

    Icing:
  • 1 stick butter
  • 4 Tbsp unsweetened cocoa
  • 6 Tbsp milk, half and half or cream
  • 1 lb box or package of confectioner's (powdered) sugar (sifted or it clumps up later)
  • 1 tsp vanilla
  • 1/8 tsp cinnamon
  • 1/4- 1/2 cup chopped nuts (optional) 
Directions:
  • Grease 9x13 inch baking pan. Preheat oven to 350 degrees F.
  • In a medium bowl, sift together the dry ingredients. Set aside.
  • In a large bowl, whisk together eggs, oil, buttermilk and vanilla. 
  • Gradually stir the dry ingredients into the bowl of wet ingredients and then fold in the grated zucchini and chocolate chips (nuts also if including).
  • Pour into prepared baking pan and bake for 45-60 minutes- time depends on how wet the zucchini is. So start checking about 45 minutes but may need to go as long as 1 hr.
  • When toothpick inserted in center of cake comes out pretty clean, remove cake to cooling rack and begin preparing the icing.
  Icing:
  • Boil butter, cocoa, milk and cinnamon in a medium saucepan, whisking constantly. (Don't worry if the butter fat separates some. Just keep stirring and then move on to next step- it will all come together in the next step.)
  • Whisk in sifted sugar while stirring and then vanilla. Stir well to combine.
  • Allow to sit and thicken for a few minutes off the heat, then pour slowly over the warm cake. (If it has thickened too much to pour, then use a spatula to spread over the cake.)
  • Garnish with nuts if desired.

Wednesday, May 21, 2014

Banana Rhubarb Bread


Ever have a bunch of food items that are going south quickly? Well, we had a bunch of bananas that ripened too quickly and I also needed to use up some frozen rhubarb... You know, when the freezer still hasn't been cleaned out and the next season's harvest needs to be put in soon! So I had an "A-ha" moment and realized I could kill two birds with one stone- and was this ever good! My daughter was even begging for some of this bread toasted with butter- our new way to enjoy sweet breads. Of course, if you really have a sweet tooth, you may glaze the top with a simple glaze, but I enjoy the simple flavors of the bread.

While on the subject about rhubarb, let me just say that I find people are often not very fond of the tartness of it, but it is something that blends so well with other flavors- both savory and sweet. If you do not like rhubarb, try substituting it for any of the berries and adjust the baking time.

Makes: 1 loaf, approximately 10 slices
Ingredients:
  • 1 cup sugar
  • 2 eggs
  • 1/3 cup coconut oil or butter (I used a mixture)
  • 1/4 cup buttermilk
  • 1 1 /2 cups bananas, mashed (about 3-4 large bananas)
  • 1 tsp vanilla
  • 1 2/3 cup flour (I used 1 cup white, 2/3 cup white whole wheat)
  • 1 tsp baking soda
  • 1/2 tsp baking powder
  • 1/2 tsp salt
  • 1 - 1 1/2 cups chopped rhubarb
  • 1/2 cup chopped nuts (optional)
Directions:
  • Preheat oven to 350 degrees F. (See note below)
  • In a large bowl, mix together the sugar, eggs and oil, beating well. Add in the milk, bananas and vanilla and mix again.
  • Sift together in a medium bowl the dry ingredients and then combine gradually with the wet ingredients. 
  • Stir in the rhubarb and nuts.
  • Pour into greased and floured bread pans.
  • Bake approximately 55-70 minutes (checking regularly after 55 minutes) or until toothpick inserted in middle comes out dry.
  • Cool on wire rack for 10-15 minutes, then turn out of pan onto rack to finish cooling.
  • After cooled, place in plastic bag to preserve moisture.

*Note: I used frozen rhubarb and included most of the rhubarb juice. If you are using fresh rhubarb, there will not be all the extra liquid but it will be inside the fruit and come out during the baking process. So check your bread as it nears the 55 minute mark and onward to make sure it does not dry out/overbake. I  also used glass bread pans, which seem to bake hotter/make the crust darker. So you will need to turn the temperature down about 25 degrees if using glass pans. 


Wednesday, April 9, 2014

Perfectly Simple Fruit Cake or Bread


I was given this recipe years ago by a coworker who brought in this cake made with fresh peaches and I just fell in love with the simple flavors. I have changed it a little over the years and find it is the perfect basic recipe that can be adapted in many different ways. Originally, the recipe called for cinnamon to be sprinkled on top of the cake instead of a crumb topping. While that version is delicious and simple, I have added a cinnamon crumb topping with a simple glaze for the apple version I made for this post. Either way, it is a wonderful moist cake that is perfect for any occasion. Try substituting all different types of fruit and use the crumb topping, or leave it off- it will be sure to please everyone! This can also be made into sweet bread using 2 bread pans and adding about 10-15 minutes to the baking time, checking regularly.

Makes 16-18 servings
Ingredients:
Cake:
  • 3 eggs, beaten well
  • 2 cups sugar (may use 1/2 brown sugar, 1/2 granulated sugar)
  • 1 cup oil
  • 2 tsp vanilla
  • 1 tsp baking soda
  • 1/2 baking powder
  • 1 tsp cinnamon (or may use apple pie spice if using apples)
  • 3/4 tsp salt
  • 3 cups flour
  • 3 cups fruit- peaches (sliced or chopped), apples (chopped), blueberries, pears, or variety of berries, etc
Crumb Topping (optional):
  • 1/3 flour
  • 1/4 cup brown sugar
  • 1/4 tsp cinnamon
  • pinch salt
  • 1/4 cup cold butter, cubed
Glaze: (optional)
  • 3/4 cup confectioner's sugar, sifted
  • 1/4 tsp vanilla
  • 2-4 Tbsp milk
Directions:
  • Preheat oven to 350 degrees F. and grease (2) 8x8 inch or (1)13x9 inch baking pan or (2) bread loaf pans.
  • Mix eggs, sugar, oil and vanilla together in a large bowl.
  • Sift the dry ingredients together in another bowl and add into the wet ingredients, combining well.
  • Stir in fruit.
  • If not using toppings, then pour batter into prepared pan(s) and sprinkle with cinnamon/sugar mixture (2 Tbsp sugar mixed with 1 1/2 -2 tsp cinnamon). Bake for about 45 minutes, checking after 35 minutes (if using loaf pans, bake for about 45-60 minutes but start checking at 40-45 minutes)- until toothpick inserted in middle comes out pretty well clean.
  • If making the crumb topping, combine the dry ingredients and then use a fork to cut in the butter until it resembles peas. Sprinkle over top of the batter waiting in the pans. (This can be made ahead before starting cake batter). Bake as instructed above.
  • After the cake is cooling on a wire rack, combine sifted confection's sugar and vanilla and milk, stirring until smooth. Start with the lesser amount of milk and gradually add more by tablespoons until the desired consistency is obtained. Pour over the cake/bread after it is cooled.

Thursday, January 30, 2014

Sour Cream Apple Pie


This pie is a wonderful mix of a custard pie with an apple pie and is one of my new favorites! In our family, my mom's apple pie is a must at every winter family dinner. Recently when I had an overabundance of apples, I went through my recipes to look for something different to try and found this recipe that my mom gave me years ago but I had never gotten around to making. I am SO GLAD I finally tried it because it is a real keeper! Since I made the Impossible Pie some time ago and discovered a new-found love of custard pies and all the different ways to work custards into desserts, this pie was right up my alley-- and not that difficult. 

unbaked pie with custard and apple before crumb topping was added

Finished pie
Serves: 8
Ingredients:
  • 1 unbaked 9-10 inch pie crust
  • 2 eggs
  • 1 cup sour cream
  • 1/2-3/4 cup sugar, depending on sweetness of apples
  • 1/4 tsp salt
  • 2 Tbsp flour
  • 1 tsp vanilla extract
  • 1/4 tsp nutmeg
  • 3 cups chopped apples
Topping:
  • 1/3 cup brown or white sugar- or a mix (I used all brown)
  • 1/3 cup flour
  • 3/4 tsp cinnamon
  • 1/3 cup cool butter
  • 1/3 cup crushed nuts (walnuts or pecans work well)
Directions:
  • Preheat oven at 375 degrees F.
  • Chop apples and set aside.
  • Prepare unbaked pie crust in pie pan.
  • Combine eggs, sour cream, sugar, salt, 2 Tbsp flour, vanilla and nutmeg and stir until smooth. 
  • Add in apples and pour into the prepared unbaked crust.
  • Bake for 15 minutes. Meanwhile combine topping ingredients using a fork to cut the butter into other ingredients until it is combined into pea-sized clumps.
  • Sprinkle over top of pie when finished with 1st 15 minute bake and bake for another 20-25 minutes or until filling is set when you lightly jiggle pie. 
  • Cool completely and serve alone or with whipped cream, ice cream or caramel syrup. Refrigerate leftovers.
Adapted from a Taste Of Home recipe.


Monday, January 27, 2014

CranApple Deep Dish Tart


This delicious combination of apple pie and apple crisp are worth the little extra effort and is the perfect autumn and winter dessert. I made this recipe and was going to share it with everyone this past fall but a lot has been happening over the past few months. My husband went through major surgery (having part of his pancreas removed), which took a long time to recover from-- but we are thankful that it was not cancerous. Now that everything is settling down, I hope to get back to sharing a few recipes that I have enjoyed lately.

I had an inspiration for this recipe when I was making an apple dessert and couldn't decide if I wanted to make apple pie or apple crisp. Since then, I have seen a number of apple pan pie recipes but nothing quite like this. The great thing about this recipe is that you can substitute many other fruits for the cranberries, fresh or dried. If you use dried fruits, plump them up some by covering them with water and heating them for about 5-10 minutes. Of course, this dish is just asking for a scoop of vanilla ice cream, too! Since I used cranberries, it is a little tart. So if you like your dessert very sweet, increase the brown or white sugar.

Serves: 6-8

Ingredients:
  • Single unbaked pie crust pastry for 10 inch pie
  • 3 pounds apples, peeled, cored and sliced
  • 1/3 cup brown sugar
  • 3 Tbsp white sugar
  • 1 ½-2 tsp apple pie spice
  • 2 Tbsp minute tapioca
  • 3 Tbsp water
  • 2 cups or ½ bag of cranberries, fresh or frozen (or may use 1 cup dried craisins) 
  • Topping:
  • ¾ cup brown sugar
  • ¾ cup flour
  • ¾ cup rolled oats
  • 1 tsp cinnamon
  • 5 Tbsp butter
  • 2 Tbsp oil
  • 1/3 cup chopped nuts
Directions:

1. Roll out the pie crust to fit 8x8 or 9x9 inch pan and spread out in pan.
2. In a large bowl, combine apples, sugars, spice, tapioca, water and cranberries. Put mixture in pie crust.
3. Prepare topping by mixing dry ingredients and cutting in the butter, adding the oil until mixture clumps together. Put topping over the apples and fold the edges of the pie crust over top of the sides of the pie.
4. Bake at 350 degrees for approximately 40-50 minutes or until the pie is bubbling and apples are tender.
5. May drizzle with caramel sauce or glaze made of 1 cup powdered sugar, 2 Tbsp milk and 1/8 tsp cinnamon and/or top with whipped cream or ice cream.


Thursday, August 8, 2013

Blueberry Buckle (coffeecake)


This is one of the recipes I remember my mom making throughout my childhood and I always thought the name was so funny. It wasn't until just recently when I was watching Alton Brown on "Good Eats" talk about his Blueberry Buckle and how a Buckle was actually an old-fashioned coffee cake that I understood the name. Don't ask me to explain or remember how the word "buckle" has anything to do with a cake!

Anyways, I love this cake because it is easy to make, full of fruit and a dense but moist cake that is a perfect treat for any occasion. I don't remember my mom ever putting a glaze on top, but it adds a nice touch. I also added the almond extract to the cake and put vanilla in the glaze, but you could use whatever flavor you like in the cake and glaze-- lemon or vanilla would be great, even coconut and mix some coconut in with the crumble topping. Also, try this with 1/2 cup chopped nuts added in the crumb topping, as well. This cake is just perfect for switching up the flavors and fruits! So give it a try and have fun with it.


Ingredients:
  • 3/4 cup sugar
  • 1/4 cup shortening (I use palm oil shortening), or you may use another oil
  • 1 egg
  • 1/2 cup milk
  • 1/2 tsp almond extract (if using vanilla- increase it to 1 or 1 1/2 tsp)
  • 2 cups flour
  • 2 tsp baking powder
  • 1/2 tsp salt
  • 2 cups well drained blueberries
   Topping:
  • 1/2 cup sugar (I used brown sugar)
  • 1/2 tsp cinnamon
  • 1/3 cup flour
  • 1/4 cup soft butter
   Glaze:
  • 3/4 cup confectioner's sugar
  • 1/2 tsp vanilla extract
  • 3 Tbsp milk, more if needed
Directions:
  • Preheat oven to 375 degrees F.
  • In a large bowl, mix sugar and shortening together until well blended. Add in egg and wisk together. Stir in the milk and extract.
  • In a smaller bowl, sift together dry ingredients. Mix into the wet ingredients in thirds.
  • Fold in the blueberries carefully so as not to break up the berries. Batter will be very thick.
  • Put in a greased 8x8 or 9x9 inch baking pan and press out to the corners of the pan, making sure it is pretty evenly distributed in the pan.
  • In small bowl previously used for dry ingredients, mix together topping dry ingredients and then cut in the butter with a pastry cutter or fork until dry ingredients have combined well with the butter- should be little clumps without a lot of extra loose flour mixture.
  • Sprinkle evenly over top of the cake batter in the pan.
  • Bake for 45-50 minutes or until toothpick inserted in center comes out clean.
  • While cake is cooling on a wire rack, mix up the ingredients for a glaze, adding milk 1Tbsp at a time until it reaches the desired consistency. If it gets too wet and runny, add more sugar. Cover glaze until cake cools.
  • After cake has cooled completely, use a spoon and drizzle the glaze over top of the cake, back and forth. Cut and serve!


Sunday, July 7, 2013

Rhubarb Cherry Coffee Cake with Caramel Sauce


This is another great rhubarb recipe that I adapted from a Taste of Home magazine. Since I had some tart cherries that were not really enough to make something by themselves, I decided to add them into the cake with the rhubarb. In addition, I opted to use some cinnamon and vanilla in the cake, as well as some chopped nuts in the topping. Feel free to leave the cinnamon out and just add vanilla. The original sauce recipe also calls for double the amount of ingredients, but I felt that even using only 1/2 the original amounts made more than enough caramel sauce. Feel free to substitute any other fruits such as apples/cranberries, mixed berries, pears. Enjoy this very moist coffee cake anytime of the year by using seasonal fruits or even frozen fruits!

Ingredients:
   Cake-
  • 1/2 cup shortening or oil
  • 1 1/2 cups sugar
  • 1 egg
  • 1 tsp vanilla
  • 2 cups flour
  • 1 tsp baking soda
  • 1/2 tsp cinnamon
  • 1 cup buttermilk
  • 1 1/2 cups finely chopped rhubarb (fresh or frozen)
  • 1 cup cherries, coarsely chopped
   Topping-
  • 1/2 cup packed brown sugar
  • 1/4 cup all purpose flour
  • 1 tsp ground cinnamon
  • 3 Tbsp cold butter
  • 1/2 cup chopped walnuts (may use other nuts instead)
   Sauce-
  • 1/4 cup butter, cubed
  • 1/2 cup packed brown sugar
  • 1/4 cup heavy whipping cream
Directions:
  • In a large bowl, cream shortening and sugar until light and fluffy.
  • Add egg and vanilla; beat well.
  • Combine flour, cinnamon and baking soda; add to the creamed mixture alternately with buttermilk.
  • Fold in rhubarb and cherries.
  • Pour into a greased 13x9 inch baking pan.
Topping:
  • In a small bowl, combine the brown sugar, flour and cinnamon.
  • Cut in the butter until crumbly. Combine the nuts. Sprinkle over batter.
Bake at 350 degrees for 35-40 minutes or until the toothpick inserted near the center comes out clean. Cool for 10 minutes before serving.

For Sauce, in a small saucepan, melt the butter. Stir in brown sugar and cream; bring to a boil. Reduce heat; simmer for 3-4 minutes or until slightly thickened. Serve with warm coffee cake.


Shared with the following:
Inspiration Monday Party
Our Sunday Best Link Party #5

Monday, January 21, 2013

Baking Mix (Biscuits, Pancakes, etc)


Here is another one of the mixes I came up with recently through trying different recipes and incorporating ones that I already use and love. As I already wrote previously, I have been looking for more mixes that are homemade because they are great for saving time, but they also save money and allow me to control more what our family eats. It is hard to find mixes that are part wheat flour and do not use partially hydrogenated oils.

This mix can be used in place of any baking mix in recipes, as well as to make biscuits or make into pancakes (although I have a buttermilk pancake mix I previously posted that I prefer). I also used palm shortening since it is naturally solid and does not turn rancid at room temperature. I had to order palm shortening online (I bought from Tropical Traditions) since it is not always readily available in many grocery stores in the U.S.

Makes about 9 batches of biscuits or pancakes
Ingredients:

  • 10 cups flour total (may divide into different types of flour but is best if not using more than 1/2 whole wheat flour)- I used 6 cups white flour, 2 cups whole wheat pastry flour and 2 cups white whole wheat flour
  • 1/2 cup baking powder
  • 2 Tbsp cream of tartar
  • 1 Tbsp + 2 tsp salt
  • 5 Tbsp sugar
  • 2 cups shortening or butter
  • 2 cups dry milk powder
Directions:
  • In a very large bowl or clean bucket/dishpan, mix all the dry ingredients together except the dry milk. 
  • Cut in the shortening or butter until it is mixed throughout the dry ingredients and is about pea-sized
  • Stir in the dry milk and mix together well.
  • Store in a cool dry place in a 1 gallon sized container. If using butter, you should keep it in the freezer or at least the refrigerator.

ac ac ac ac ac ac 

To Make Biscuits:
  • Preheat oven to 425 degrees F.
  • Mix together 1 1/2 cups of baking mix with 1/2 cup milk in a medium bowl. (Add it gradually and use a little less if you want to make the dough drier so it can be rolled/cut out).
  • Drop by rounded spoonfuls onto an ungreased baking sheet and bake in preheated oven for 8-10 minutes or just until the tops are golden brown.
  • Remove to a cooling rack.
To Make Pancakes:
  • In a medium bowl, beat together 1 egg, 1 cup of milk and 1 tsp vanilla.
  • Add in 1 1/2 cup of baking mix and stir just until moistened being careful not to overmix.
  • Fry on a greased, hot frying pan or griddle.


Adapted from Baking Mix recipe in Simply In Season, 2009

Wednesday, June 20, 2012

Rhubarb Custard Cake


Our rhubarb has not grown very well this year. I kept holding off cutting it to see if the stalks would grow a little bigger. Now that the weather is getting hot,  I decided that I needed to cut the largest ones and leave the rest. This is an easy cake that was originally from "Taste of Home" by Evelyn Gebhardt, and I just love the way it turns out. It uses a cake mix, and if you don't like them, just substitute your favorite yellow/butter or white cake recipe. There is such a great balance between the sweet cake, the tartness of the rhubarb and the creaminess at the bottom.

Serves 12-15
Ingredients:
  • 1 yellow cake mix (18 1/4 oz)
  • 4 cups chopped fresh or frozen rhubarb
  • 1 cup sugar
  • 1 cup heavy or whipping cream
  • whipped cream and fresh mint (optional) for topping
Directions:
  • Preheat oven to 350 degrees.
  • Prepare cake batter according to package directions. Pour into greased 13x9 inch baking dish.
  • Sprinkle with rhubarb and sugar.
  • Slowly pour cream over top.
  • Bake at 350 degrees for 40-45 minutes or until golden brown. 
  • Cool for 15 minutes before serving.
  • Garnish with whipped cream and mint if desired.
  • Refrigerate leftovers.


**Alternatively, you can increase the cream to 1 pint (2 cups) and bake it longer, about 1 1/4 hours. Follow the recipe the same as above otherwise. This gives a thicker custard layer. See picture below:


Shared with the following:

SixSistersStuff.com
Ladybird Ln

Thursday, May 10, 2012

Blueberry Fantasia bars


This is a quick and yet decadent dessert that I found on the back of a Lucky Leaf Blueberry Pie Filling jar. I made it and brought it to my cooking club meeting recently and it was a big hit. I love any type of dessert that has a type of cheesecake layer. In addition, coconut has been one of my favorite things lately to work into recipes. So I was interested to try this recipe since it has coconut, nuts, pie filling and cheesecake. You can't go wrong with something like this! This recipe could also be switched up a little by using cherry or some other type of berry pie filling and use some other flavors in the cheesecake, like coconut. I added some lemon extract, which really added some brightness to the dessert.

Serves 12


Ingredients:

  • 1 pkg (18 oz.) yellow cake mix
  • 1/2 cup butter, melted
  • 3 eggs
  • 1 pkg (8 oz) cream cheese
  • 2 1/2 cups confectioner's sugar
  • 1 tsp lemon extract (or vanilla or coconut)
  • 1 1/2 cup blueberry fruit filling (I used a whole can of filling)
  • 3/4 cup flaked coconut
  • 3/4 cup chopped nuts
Directions:
  • In large bowl, blend cake mix, butter and 1 egg.
  • Pat mixture into greased 9x13 inch baking pan.
  • Beat cream cheese until fluffy; add in 2 eggs, flavoring and sugar. Pour over cake mixture.
  • Spoon fruit filling on top evenly. Sprinkle  with coconut and nuts.
  • Bake at 350 degrees for 50-55 minutes until lightly browned. (Cheesecake layer should not be too wet/jiggly when testing it.)
  • Cool/refrigerate for about 30-45 minutes before cutting.
*Note: the cheesecake layer may be a little soft. You may need to clean the knife after each cut so the cheesecake does not smear all over the other parts. (That's just more for you to taste!)


I also wanted to share that I was one of the bloggers given the Versatile Blogger award by Susie at Earning-My-Cape a few weeks ago (maybe even a little longer- time has been flying by lately). Although I am unable to fulfill all the requirements in accepting that award at this time, I wanted to give her a big THANKYOU!!!! and a tell everyone to check out her blog and show her some blog love. She is just getting started in the blogging world and shares quite a variety of things that she is working on- from various crafts to cooking to information that is useful for our health and families, and basically whatever is happening with her family at that time (like a lot of us do). She is really another sweet person that I have had the privilege to meet since I started blogging. 


Shared with the following:

Miz Helen’s Country CottageCast Party Wednesday
Friday Flair Link Party #19 at Whipperberry

Saturday, April 28, 2012

Sugar Cake


mixed lilacs
tulips


azalea
daffodils

helleborus

Valley Valentine Japonica


apple blossoms

 
Spring is such a beautiful time of year, and I just had to share some of the flowers in bloom at our house. Right now, I picked some lilacs and the scent is perfuming our entire house. Growing up, there were lilacs around our house, and later the house my husband and I bought had a large number of old lilac bushes of various colors throughout the entire property. I must say, they are one of my favorite flowers. We have since removed some of them to open up some areas and clean up the yard some (still very much a work in progress). Our small home orchard was also beautiful this spring in full bloom. I hope this translates into a good fruit crop.

I know that in some parts of the U.S. it is rhubarb season, but ours is not quite ready. We were finally able to harvest a nice supply last spring/early summer. In our area, there is actually a rhubarb festival that features this tart plant in many different ways. I had posted a recipe for rhubarb dessert sauce previously and thought I would share this old fashioned cake recipe that goes so well with the rhubarb sauce.

rhubarb


This is a  cake that was made for our family by a good friend when my last baby was born. She made some wonderful soups that we could heat up and eat when we needed quick meals, and she also made this cake for dessert to go with some rhubarb sauce she had made. Her mother-in-law used to make this recipe for many years, and my friend remembers her making it to take with them when they went camping. They often ate it for breakfast with applesauce, but it is also a simple cake that goes well with ice cream and just about any other type of dessert sauces or toppings.

I had to look around for a while to find the right kind of sugar to use on the top so that it would not dissolve into the cake during the baking process. You should use some type of specialty sugar that is larger granules and may be called gourmet sugar or coating sugar. I noticed this sugar has wax added, which I believe helps keep it more solid. When I made these cakes, my daughter saw I had bought some pink coating sugar and so she wanted "her" cake to have the colored sugar. The other cake was coated with the gourmet sugar that was white and larger granules. It seemed to sink into the top of the cake batter slightly more than the coating sugar, which surprised me, but it made a lovely glittery, crunchy top layer on top of the cake. If you cannot find this type of sugar, you can still use the regular granulated sugar- it will just dissolve somewhat into the top of the cake as it bakes.

 I really enjoy this cake because of the moist, tender crumb with the crunchy top. The original recipe called for it to be baked in 3 pie plates, but I decided to use two 9 inch cake pans. I just had to adjust the baking time approximately 10-15 minutes longer. My friend has also made the cakes in a couple smaller oblong cake pans with good results.


Ingredients:

  • 1 3/4 cup sugar
  • 3/4 cup shortening (I used olive oil)
  • 3 eggs
  • 1 cup buttermilk or sour milk
  • 1 tsp vanilla (I used about 1 1/2 or 2 tsp)
  • 3 cups flour
  • 1 tsp baking soda
  • 1 tsp cream of tartar
Directions:
  • Cream shortening or oil with sugar. 
  • Beat eggs and add to sugar and oil.
  • Add sour milk and vanilla.
  • Sift dry ingredients and add to wet ingredients in batches while mixing.
  • Divide into 3 greased pie pans (I used two greased 9 inch round cake pans). 
  • Sprinkle top with additional granulated sugar.
  • Bake at 350 degrees for 20-25 minutes for pie plates or about 30-35 minutes if using cake pans (check frequently and test with toothpick in the center when it appears golden brown on top).
  • Cool on rack for about 20 minutes and then may serve with toppings of choice if desired.
One cake could be wrapped in plastic and frozen to be eaten later.