Saturday, December 17, 2016

Nutmeg Sour Cream Drops


These cookies bring back memories of my grandmother. She loved to bake and cook and almost always had some type of cookies on hand in case anyone stopped by to visit. She often made these in the winter months, and I remember eating these many times over the years when visiting her. The cookies are not hard to make but icing of the cookies and putting on the nut topping takes some extra time. However, the extra work is worth it because the icing and little bit of nuts on top just take these little gems over the top. They are perfect for a special gathering or just to have with some tea or coffee. If you keep them in a sealed container, they will keep for quite some time or you can freeze them and thaw later if you need some sweets on hand.

Ingredients:

  • 2 1/2 cups flour
  • 1 tsp baking soda
  • 1/2 tsp baking powder
  • 1/4 tsp salt
  • 1/4-1/2 tsp nutmeg (I used 1/2 tsp of nutmeg and did not think it was too strong)
  • 1 1/2 packed brown sugar
  • 3/4 cup shortening or butter (I used butter)
  • 2 slightly beaten eggs
  • 1 tsp lemon peel
  • 1 tbsp lemon juice
  • 2/3 cup sour cream
  • 2/3 cup chopped walnuts
Browned Butter Frosting:
  • 3 tbsp butter
  • 2 cups confectioner's sugar (10x)
  • 2 tbsp milk
  • 1 tsp vanilla
Directions:
  • Sift your dry ingredients together in a medium bowl
  • In a large bowl, cream together the butter or shortening and sugar, then add in the eggs
  • Mix the dry ingredients into the wet mixture and add in the lemon peel, lemon juice and sour cream
  • Drop by rounded teaspoons onto greased cookie sheet 2 inches apart. 
  • Bake at 375 degrees F for 8-10 minutes or until edges are slightly browned.
  • Cool on a rack
  • Prepare browned butter frosting as follows- Melt the butter in a medium saucepan and stir until brown.
  • Remove from heat and slowly beat in sifted confectioner's sugar (10x), milk and vanilla.
  • Spread frosting immediately while still warm on the cookies
  • Sprinkle the chopped nuts over the top of the cookies while the frosting is still warm


Wednesday, December 30, 2015

Waldorf Salad


Anyone remember Waldorf Salad from years gone by? Well, even though I have seen it in older cookbooks, I don't remember eating it until just recently. My sister in law asked me to make one and bring it to a family birthday party. So after perusing the internet and reading through my vast collection of cookbooks, I tweaked some and came up with my version of the Waldorf Salad. For the party, I made up a big batch, expecting to bring home leftovers and enjoy them over the next few days. When I opened the dish at home later, I was shocked to see it almost finished off!

The basic salad consists of usually apples, celery and nuts with either raisins or grapes. The dressing varies a little but is usually mayonnaise and/or sour cream, or yogurt. I initially wasn't sure about using mayonnaise in the dressing with yogurt but it went together very well. Also,  I have decided that I prefer to use a variety of apples since you get all the different nuances of apple flavor working together.

I have varied the dressing a couple ways and each is equally delicious. The first time I made the salad, I used equal parts mayonnaise and vanilla yogurt. The second time, I only had about 2-3 Tbsp before I ran out of mayonnaise. So I just added that to enough sour cream to equal the vanilla yogurt and it was still very good. Try both of the versions out! As a side note- the amounts may vary depending on the size of your fruit and I often eyeball my amounts. I like to use about 1 part celery: 2 parts grapes: 3 parts apple.

Makes about 10 cups

Ingredients:
  • 6 apples, variety of types coarsely grated or chopped
  • 4 ribs of celery hearts, chopped
  • 1 pound of grapes, halved or quartered if large
  • 1 cup chopped walnuts (even better flavor if slightly toasted before chopping)
  • 1 cup vanilla yogurt
  • 1 cup mayo or sour cream or mixture of both

Directions:
  • Chop the fruits, celery and nuts. 
  • Mix together the dressing ingredients. 
  • Pour over the fruit and mix well.
  • Refrigerate until serving. 


Wednesday, February 11, 2015

Russian Black Bread and a Pastrami, Egg on Russian Black Bread Sandwich


I have always loved hearty and rustic breads because they seem to have so much flavor. So when a friend told me about trying some homemade Russian Black Bread, I was excited to try making it also. Since I wanted to be sure to have a really rich, dark bread like dark pumpernickel bread, I increased some of the ingredients from other recipes I found. I absolutely love the seeds in this bread! They really add to the texture and flavor. This recipe was adapted from one on Allrecipes.com and a couple other ones that were a little different. Additionally, if you have whole rye berries (whole rye grains),  try adding 1/2 cup (that have been softened by soaking or cooking) to the dough when almost finished kneading for a wonderful chewy texture. After this came out of the oven, everyone was in heaven eating it warm with butter. Later, it was wonderful made into a Pastrami Egg Sandwich with Thousand Island Dressing (a half-wink to the Reuben sandwich). I also made this in my bread machine but it can also be mixed/kneaded with a stand mixer or food processor (or by hand) and then baked in a large loaf pan. This is the perfect bread to have with a hot bowl of soup!

Makes 1 loaf- 1 1/2 pounds

Ingredients:
  • 1 1/2 cups warm water
  • 2 Tbsp cider vinegar
  • 2 cups bread flour
  • 1 1/2 cups rye flour
  • 1 tsp salt
  • 2 Tbsp coconut oil or butter
  • 2 Tbsp black strap or regular molasses
  • 1 Tbsp brown sugar
  • 3 Tbsp unsweetened cocoa powder
  • 1 Tbsp instant coffee granules
  • 1 Tbsp caraway seed
  • 1/2 tsp fennel seed
  • 2 tsp active dry yeast
  • 1 tsp dried onion flakes or 2 Tbsp finely chopped onion
Directions:
  • Place ingredients into the bread machine in the order recommended by the manufacturer. 
  • Use Whole Wheat setting, regular crust.
  • After baking cycle ends, remove bread from pan and allow to cool on wire rack for about 1 hour (or as long as you can resist!) before slicing or the bread will be gummy.
  • If making by hand and using instant yeast, mix yeast with dry ingredients and stir in wet ingredients until the dough is no longer very wet and able to be kneaded.
  • If using Active Dry Yeast, you need to rehydrate the yeast by mixing it in 1/4 cup of the warm water and proofing first- wait until it gets a little bubbly.
  • Then mix the wet ingredients into the dry ingredients until worked together well. Cover with a bowl and allow to rest for about 30 minutes. 
  • Knead dough for about 10 minutes. Cover and place in warm place to double in size. (It may not completely double if using this much rye flour.)
  • Punch dough down and knead for about 5 more minutes. 
  • Place in greased bread pan and bake in a preheated oven at 350 degrees F for about 45-50 minutes. 
  • If desired, baking sheet may be used that has cornmeal sprinkled and then dough put on the sheet with top of dough ball slashed diagonally a couple times with a sharp knife.


Here is the perfectly sublime sandwich that was so good! Use Thousand Island salad dressing on both slices of bread, then layer slices of pastrami, add a semi-soft yolk fried egg (well seasoned), slice of cheese- pepper jack or a creamy cheese is good, thin slices of onion. A little sauerkraut layer would be wonderful, also!

Sunday, August 24, 2014

Zucchini Pineapple Bread with Pineapple Glaze


Here is yet another favorite zucchini recipe. I grew up eating (and still love) spiced zucchini bread with pineapple and sometimes raisins or dates in it, but I love the simplicity of this recipe. It is so moist, like most other zucchini recipes, but the pineapple really shines through in this sweet bread. The pineapple glaze also adds another pop of pineapple flavor that is just perfect! This bread is best a day or two after being baked (if you can keep it hidden that long)- store in a plastic bag and then glaze it an hour or more before serving, allowing the glaze to dry some and not be so sticky. The other thing I love about this recipe is that it makes 2 loaves- and you will find that both are eaten so quickly that you will be glad you made 2 loaves since nobody is going to stop at one slice! 

Makes 2 loaves - about 20 servings
Ingredients:
  • 4 eggs
  • 1 3/4 cups sugar
  • 2 tsp vanilla
  • 1 cup oil (coconut oil is great)
  • 3 cups flour (I used ½ white wheat flour and ½ all purpose flour)
  • 1 tsp baking powder
  • 3/4 tsp baking soda
  • 1 15 oz. can of crushed pineapple, juice drained and reserved
  • ¾ - 1 cup chopped walnuts
  • 2 cups shredded zucchini (I peeled mine)- seeds also removed if large
  • ¾ cup confectioner's sugar, sifted
  • 2 Tbsp pineapple juice


Directions:
  • Preheat oven to 350 deg F. Grease and flour 2 bread loaf pans; set aside.
  • In a medium bowl, sift together dry ingredients. 
  • In a large bowl, whisk together eggs, sugar, vanilla and oil- or use mixer on low until combined, then increase to medium speed for 1 minute.
  • Add in pineapple, zucchini and nuts and mix together until completely combined.
  • Gradually add in dry ingredients.
  • Divide half of batter between the 2 prepared bread loaf pans. Drop pan on hard surface a few times to even out the batter and help bubbles come to the top. 
  • Bake in preheated oven for 55-60 minutes or until toothpick inserted in center of bread comes out clean. 
  • Cool breads in pans on cooling racks for about 10 minutes, then carefully turn out onto cooling rack to finish cooling.
  • To prepare the glaze, sift the powdered sugar into a medium bowl. Add in reserved pineapple juice, adding the juice gradually, 1 tablespoon first and then 1 teaspoon at a time. If you want the glaze firmer to stay on top of the bread more, do not add as much liquid. Combine well and pour part of glaze over top of the cooled loaves and wait about 10 minutes for the glaze to thicken some. After glaze has dried a little on the bread, add any remaining glaze to add another layer, also scooping up any glaze that has drizzled down over the sides. This will be thicker and can be spread over top of the loaves again. Let loaves set until glaze is not sticky wet. Slice and serve or store in a covered container (if putting in a bag or covering with plastic wrap, the glaze will soften and stick to the plastic). I wait to apply the glaze until before serving as it becomes very wet and sticky in the bag/storage container.
*If you desire to make it a piƱa colada sweet bread- add ½- ¾ cup of sweetened shredded coconut into your batter with the shredded zucchini, but the coconut will make the loaf a little more dry. So adding a couple Tbsp's of pineapple juice may help the loaf still be moist. Otherwise, remove the loaf from the oven immediately- may be finished sooner.


**This bread is wonderful frozen and later thawed, glazed and served.


Friday, August 15, 2014

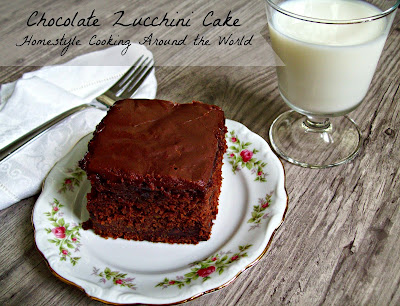
Chocolate Zucchini Cake


While I am not a chocolate cake fan (I like cakes with fruit and other add-in's), this cake has changed my mind. It has a moist and fudgey consistency, unlike many chocolate cakes that I find are more dry and lacking in flavor. Of course, the moisture comes from the zucchini that totally disappears in the cake, especially if you peel it before shredding it. What sets this recipe apart from other chocolate zucchini cakes is that is uses more zucchini and includes vanilla and cinnamon, which adds something special to round out the chocolate flavor. 

I found that 4 cups of shredded zucchini equals about 1 large zucchini or 3/4 of a super-large one, minus the center pulp area with the seeds. If you are using smaller zucchini, you probably do not need to remove the seeds unless they are large. Since we are often finding those big zucchinis that have somehow been missed until they are enormous, this is just about the tastiest way to use up one of those over-sized veggies. There have been a couple people that tell me adamantly that they do NOT like zucchini, but when they tried this cake (through a little deception) they were amazed that something this good would have THAT in there-- and even went back for more. (I just love tricking people into eating veggies that they thought they didn't like!)

Ingredients:
  • 2 1/2 cups flour
  • 1 3/4 cups sugar
  • 1/2 cup unsweetened cocoa
  • 1 1/2 tsp baking soda
  • 1 1/2 tsp baking powder
  • 1/2 tsp salt
  • 1 tsp cinnamon
  • 4 eggs
  • 1 cup oil
  • 1/2 cup buttermilk
  • 1 tsp vanilla
  • 4 cups peeled, grated zucchini (I let the zucchini drain in a colander while preparing the cake but did not press the liquid out of it.)
  • 3/4 cup chopped nuts (optional)
  • 3/4-1 cup semi sweet chocolate chips (about 1/2 of 11 oz bag)

    Icing:
  • 1 stick butter
  • 4 Tbsp unsweetened cocoa
  • 6 Tbsp milk, half and half or cream
  • 1 lb box or package of confectioner's (powdered) sugar (sifted or it clumps up later)
  • 1 tsp vanilla
  • 1/8 tsp cinnamon
  • 1/4- 1/2 cup chopped nuts (optional) 
Directions:
  • Grease 9x13 inch baking pan. Preheat oven to 350 degrees F.
  • In a medium bowl, sift together the dry ingredients. Set aside.
  • In a large bowl, whisk together eggs, oil, buttermilk and vanilla. 
  • Gradually stir the dry ingredients into the bowl of wet ingredients and then fold in the grated zucchini and chocolate chips (nuts also if including).
  • Pour into prepared baking pan and bake for 45-60 minutes- time depends on how wet the zucchini is. So start checking about 45 minutes but may need to go as long as 1 hr.
  • When toothpick inserted in center of cake comes out pretty clean, remove cake to cooling rack and begin preparing the icing.
  Icing:
  • Boil butter, cocoa, milk and cinnamon in a medium saucepan, whisking constantly. (Don't worry if the butter fat separates some. Just keep stirring and then move on to next step- it will all come together in the next step.)
  • Whisk in sifted sugar while stirring and then vanilla. Stir well to combine.
  • Allow to sit and thicken for a few minutes off the heat, then pour slowly over the warm cake. (If it has thickened too much to pour, then use a spatula to spread over the cake.)
  • Garnish with nuts if desired.

Wednesday, August 13, 2014

Greek Inspired Pasta Sauce


We have had a bumper crop of tomatoes this year and this was yet another recipe born out of necessity. In addition, we were given lots of eggplant and also had zucchini overflowing our kitchen counter. While I have plans for the extra zucchini, I wanted to make something that would use all of these vegetables. Today I was feeling in the mood to make something Greek. So after looking through my Greek cookbook, I saw a recipe for Eggplant Meat Sauce, which became my inspiration for this dish. This dish requires a little chopping but really comes together quickly and is so rich and flavorful. One of the things I love about Greek meat dishes is the addition of cinnamon. It adds a unique flavor and warmth that to me is simply addicting. This dish is also wonderful if you make the sauce ahead of time, refrigerate and then reheat, adding in cooked pasta when ready to serve. The flavors will be even better! Also, if you don't have fresh tomatoes, just use a large can of diced or crushed tomatoes with their juice.

Serves 6-8
Ingredients:
  • 3/4 pound of ground meat- lamb, beef (I used venison, which worked very well)
  • 1 large onion, chopped
  • 1 large eggplant, peeled and cubed
  • 4 cloves garlic, peeled and thinly sliced or minced
  • 1 medium zucchini, cubed
  • 1 large green or colored pepper, diced
  • 4 Tbsp butter/olive oil mixture (I used half butter and half olive oil)
  • 2-3 Tbsp dried parsley, or 1/3 cup fresh chopped parsley
  • 1 Tbsp dried oregano, crushed before adding
  • 1/4 tsp ground nutmeg
  • 1 tsp ground cinnamon
  • pepper to taste
  • salt to taste (I used Goya's brand Adobo seasoned salt mixture)
  • 3-4 Tbsp tomato paste
  • 4 cups diced fresh tomatoes (including juice)
  • 3 bay leaves
  • 1 tsp sugar
  • 1 pound #2 ziti or pasta of choice, cooked for about 2 minutes less than directions state on package
This pot is almost full with all the veggies and meat, but everything will cook down.
Adding in the tomato paste- When I open a can, I freeze any extra paste for use later.

Directions:
  • In a large covered pot, brown the meat with the chopped eggplant, onion, garlic, zucchini, pepper, butter/oil. As the meat begins to brown, add in the seasonings and tomato paste. Stir around until the paste becomes fragrant. 
  • After all the meat and vegetables have browned/softened, then add in the chopped tomatoes, bay leaves and sugar. Cook covered over medium high heat for about 10 minutes until the tomatoes begin to break down, then simmer for another 15 minutes uncovered to thicken the sauce. 
  • Taste the sauce and add more salt if needed. Cook the pasta as instructed above in salted water. When pasta is ready, use a hand strainer and put directly into the sauce pot. (Don't worry about some pasta water being added- it will thicken the sauce somewhat.) Lift and fold the sauce around the pasta and then allow to simmer for another 5 minutes to further meld the flavors.
  • Garnish with feta cheese and/or a shredded hard Greek cheese, or may use grated Parmesan or Romano cheese. Also optional is red pepper flakes.
This is good with a Greek salad or a simple side of sliced cucumbers, a dip made of lemon juice, a little mint, parsley and dill (or tzatziki sauce) and some olives.

Wednesday, May 21, 2014

Banana Rhubarb Bread


Ever have a bunch of food items that are going south quickly? Well, we had a bunch of bananas that ripened too quickly and I also needed to use up some frozen rhubarb... You know, when the freezer still hasn't been cleaned out and the next season's harvest needs to be put in soon! So I had an "A-ha" moment and realized I could kill two birds with one stone- and was this ever good! My daughter was even begging for some of this bread toasted with butter- our new way to enjoy sweet breads. Of course, if you really have a sweet tooth, you may glaze the top with a simple glaze, but I enjoy the simple flavors of the bread.

While on the subject about rhubarb, let me just say that I find people are often not very fond of the tartness of it, but it is something that blends so well with other flavors- both savory and sweet. If you do not like rhubarb, try substituting it for any of the berries and adjust the baking time.

Makes: 1 loaf, approximately 10 slices
Ingredients:
  • 1 cup sugar
  • 2 eggs
  • 1/3 cup coconut oil or butter (I used a mixture)
  • 1/4 cup buttermilk
  • 1 1 /2 cups bananas, mashed (about 3-4 large bananas)
  • 1 tsp vanilla
  • 1 2/3 cup flour (I used 1 cup white, 2/3 cup white whole wheat)
  • 1 tsp baking soda
  • 1/2 tsp baking powder
  • 1/2 tsp salt
  • 1 - 1 1/2 cups chopped rhubarb
  • 1/2 cup chopped nuts (optional)
Directions:
  • Preheat oven to 350 degrees F. (See note below)
  • In a large bowl, mix together the sugar, eggs and oil, beating well. Add in the milk, bananas and vanilla and mix again.
  • Sift together in a medium bowl the dry ingredients and then combine gradually with the wet ingredients. 
  • Stir in the rhubarb and nuts.
  • Pour into greased and floured bread pans.
  • Bake approximately 55-70 minutes (checking regularly after 55 minutes) or until toothpick inserted in middle comes out dry.
  • Cool on wire rack for 10-15 minutes, then turn out of pan onto rack to finish cooling.
  • After cooled, place in plastic bag to preserve moisture.

*Note: I used frozen rhubarb and included most of the rhubarb juice. If you are using fresh rhubarb, there will not be all the extra liquid but it will be inside the fruit and come out during the baking process. So check your bread as it nears the 55 minute mark and onward to make sure it does not dry out/overbake. I  also used glass bread pans, which seem to bake hotter/make the crust darker. So you will need to turn the temperature down about 25 degrees if using glass pans. 


Friday, April 11, 2014

Easy Garden Bake


This is another one of my favorite brunch casseroles and it is perfect for those times you have a bunch of different vegetables and want to throw together something satisfying and balanced in no time at all. It can easily be an easy lunch or dinner with a salad, as well. 

Makes 6 servings
Ingredients:
  • 1 cup chopped zucchini (about 1 smaller)- you can always add more
  • 1 large tomato, chopped- about 1 cup, or may use chopped cherry or grape tomatoes
  • 1 medium - large onion, chopped
  • 1/3 cup grated Parmesan cheese
  • 1/2 cup baking mix of choice
  • 1 cup milk
  • 1/2 tsp salt (may use a seasoned salt)
  • 1/4 tsp pepper
  • 1 tsp Italian seasoning blend, crushed in palm of hand (or 1/2- 3/4 tsp oregano, crushed)
  • 2 eggs
  • cheese of choice for topping - I like Monterey Jack, Cheddar and Mozzarella  
  • green onion and parsley or cilantro for garnish
Directions:
  • Preheat oven to 400 degrees F. Lightly grease square baking dish- 8x8 or 9 inch pie plate (I doubled everything and put in 13x9 inch pan because I like leftovers!). 
  • Sprinkle chopped vegetables and parmesan cheese evenly over baking dish. 
  • Stir baking mix, milk, salt, pepper, seasoning and eggs together and pour over top of the vegetables and cheese.
  • Bake uncovered about 35 minutes or until knife inserted in center comes out clean. Remove to wire rack and sprinkle with cheese for topping. Cool 5 minutes and then garnish with fresh chopped parsley or cilantro and sliced green onions, if desired. 
*This is also wonderful with 1 cup cooked chicken or sausage added in with vegetables when assembling the casserole.


[Adapted from Bisquick Breakfast and Brunches recipe booklet, 1999]


Wednesday, April 9, 2014

Perfectly Simple Fruit Cake or Bread


I was given this recipe years ago by a coworker who brought in this cake made with fresh peaches and I just fell in love with the simple flavors. I have changed it a little over the years and find it is the perfect basic recipe that can be adapted in many different ways. Originally, the recipe called for cinnamon to be sprinkled on top of the cake instead of a crumb topping. While that version is delicious and simple, I have added a cinnamon crumb topping with a simple glaze for the apple version I made for this post. Either way, it is a wonderful moist cake that is perfect for any occasion. Try substituting all different types of fruit and use the crumb topping, or leave it off- it will be sure to please everyone! This can also be made into sweet bread using 2 bread pans and adding about 10-15 minutes to the baking time, checking regularly.

Makes 16-18 servings
Ingredients:
Cake:
  • 3 eggs, beaten well
  • 2 cups sugar (may use 1/2 brown sugar, 1/2 granulated sugar)
  • 1 cup oil
  • 2 tsp vanilla
  • 1 tsp baking soda
  • 1/2 baking powder
  • 1 tsp cinnamon (or may use apple pie spice if using apples)
  • 3/4 tsp salt
  • 3 cups flour
  • 3 cups fruit- peaches (sliced or chopped), apples (chopped), blueberries, pears, or variety of berries, etc
Crumb Topping (optional):
  • 1/3 flour
  • 1/4 cup brown sugar
  • 1/4 tsp cinnamon
  • pinch salt
  • 1/4 cup cold butter, cubed
Glaze: (optional)
  • 3/4 cup confectioner's sugar, sifted
  • 1/4 tsp vanilla
  • 2-4 Tbsp milk
Directions:
  • Preheat oven to 350 degrees F. and grease (2) 8x8 inch or (1)13x9 inch baking pan or (2) bread loaf pans.
  • Mix eggs, sugar, oil and vanilla together in a large bowl.
  • Sift the dry ingredients together in another bowl and add into the wet ingredients, combining well.
  • Stir in fruit.
  • If not using toppings, then pour batter into prepared pan(s) and sprinkle with cinnamon/sugar mixture (2 Tbsp sugar mixed with 1 1/2 -2 tsp cinnamon). Bake for about 45 minutes, checking after 35 minutes (if using loaf pans, bake for about 45-60 minutes but start checking at 40-45 minutes)- until toothpick inserted in middle comes out pretty well clean.
  • If making the crumb topping, combine the dry ingredients and then use a fork to cut in the butter until it resembles peas. Sprinkle over top of the batter waiting in the pans. (This can be made ahead before starting cake batter). Bake as instructed above.
  • After the cake is cooling on a wire rack, combine sifted confection's sugar and vanilla and milk, stirring until smooth. Start with the lesser amount of milk and gradually add more by tablespoons until the desired consistency is obtained. Pour over the cake/bread after it is cooled.

Wednesday, March 19, 2014

Italian Escarole Turkey Soup


I am a huge soup lover and really love ones that are easy to put together. This is one of these types of soups- if you have some greens (any type of salad greens, really) and leftover turkey or chicken, you can put this together pretty quickly. While this soup makes a larger pot, I like to have some leftovers and if you are a small family, put part of it in the freezer for another meal or two. It is a perfect cook-ahead meal. If you haven't tried escarole, be sure to give it a try. I just love having different types of greens wilted in soups.

Serves- 8-10 servings
Ingredients:
  • 1 large onion
  • 4 large garlic cloves, minced
  • 2 carrots, peeled and sliced
  • 2 celery ribs, sliced
  • 2-3 Tbsp olive oil
  • 1 15 oz. can diced tomatoes (preferably with Italian herbs)
  • 1 15oz. can white beans, drained
  • 8 1/2 cups chicken broth
  • 2 tsp dried parsley
  • 1 Tbsp Italian seasoning blend
  • 1/2 tsp black pepper
  • 2 cups chopped cooked turkey
  • 2-3 cups rice
  • 2 heads escarole
  • fresh parsley or cilantro, chopped
  • shredded parmesan cheese
Directions:
  • In a large stockpot, sautĆ© onion, carrot and celery in oil until onion is becoming translucent. Then add in minced garlic and cook for another 2 minutes, stirring frequently. 
  • Add in tomatoes, beans, broth, seasonings and turkey. 
  • Bring to a boil, then simmer while you prepare rice and escarole.
  • Cook the rice per instructions on the package, seasoning it well. 
  • Wash the escarole well and chop it.
  • When rice is cooked, add in escarole to soup and allow to wilt for a couple minutes. Adjust salt to taste, if needed.
  • To serve, put a large rounded spoonful of rice in a soup bowl, then ladle soup over top and garnish with fresh parsley and parmesan cheese. Good with crusty, rustic bread for dipping in broth. 


Shared with:
Miz Helen's Country Cottage: Full Plate Thursday 3-27-14

Friday, February 7, 2014

Scottish Raisin Bread


This bread and recipe was given to us recently from my mom and has become one of my husband's favorites. Sometime in the past few months, I discovered the idea to toast sweet bread and add a little butter (I know, I'm probably a little slow!). Well, this bread is a perfect candidate and is just the thing for a snack or with a cup of tea (insert favorite hot beverage).  When I toasted this bread, I let it go a little longer because it is so dense and I wanted it a little crispy. Was it ever good! The toasting really brings out the sweetness of the raisins and adds more flavor to the nuts and oats. You could also add some jam or other toppings, but I don't feel it needs anything else.

I have not found a recipe quite like this before and was excited to share it here. The only place I was able to find a somewhat similar recipe was over at Always In The Kitchen. As the author of that site noted, this recipe may not be Scottish- but it sounds nice, and Scotland brings to mind oats and raisins (or currants), right? My recipe has much more oats and a little more sugar (still is not very sweet)- but these recipes do not have any oil. For a stronger molasses flavor, I used about 1/2 black strap molasses. So put your spin on it and give it a try! (By the way, if you don't have a toaster oven, be very careful trying to toast sweet breads in a regular toaster without some type of a sleeve for toasting as the slice will probably fall apart and you will be burned trying to remove it.)

Makes 2 loaves

Ingredients:

  • 2 eggs
  • 1 cup brown sugar
  • 2 1/3 cups buttermilk or soured milk
  • 2/3 cup molasses
  • 3 cups flour
  • 1 tsp salt
  • 1 tsp baking powder
  • 2 tsp baking soda
  • 1 1/2 cups rolled oats (I used quick oats and it was fine)
  • 1/2 cup chopped nuts
  • 1 1/2 cups raisins, dried currants or craisins, or a mix
Directions:
  • Preheat oven to 350 degrees F- (25 degrees lower if using glass baking pans).
  • Mix eggs with sugar in a large mixing bowl, then add in the milk and molasses.
  • Sift the dry ingredients together and add into the wet mixture.
  • After mixture starts to come together, add in the nuts and dried fruit.
  • Divide the batter between 2 greased loaf pans.
  • Bake for approximately 1 hour or until toothpick inserted in center comes out dry- start checking around 50 minutes if top of bread appears less moist

*My mom told me, after I originally posted this recipe, that she got it from What's Cooking At Myrtle cookbook by Levia Lerch. I increased the liquids since the bread seemed too dry. If you find it takes too long to finish baking, you can decrease the liquid to 2 cups buttermilk.


Monday, February 3, 2014

Easy but Amazing Bolognese Sauce (Meat Sauce)


This is the sauce to make when you are short on time and need something full of flavor. Although I have typically kept a stock of store-bought spaghetti sauce on hand and add in herbs and other items to give it more flavor, I have been looking for recipes to make more things from scratch and be more in control of the ingredients in our food. When I saw this sauce recipe from Kristin Porter (Best-Ever Bolognese Sauce), I was impressed with how easy it looked and is similar to how I made some homemade sauces in the past. I have adapted this recipe and was so pleased with the flavors- totally worth a little extra effort over opening a jar and pouring it in a pot. 

Ingredients:
  • 1 1/2 pound ground beef (or may use part or all Italian sausage)
  • 1 large onion, chopped (about 1 cup)
  • 1 cup chopped mushrooms
  • 2 medium carrots, chopped (1 cup)
  • 3 cloves garlic, minced (or a little more)
  • 1 cup half and half or milk (not lowfat)
  • 1 cup beef broth
  • 1 Tbsp white wine vinegar
  • 1 (28 oz.) can crushed tomatoes
  • 1 (6 oz.) can tomato paste
  • 2 tsp Italian seasoning, crushed in palm before adding
  • 1 tsp black pepper
  • 1/2 - 1 tsp salt (or adjusted to taste)
  • 1 pound pasta of choice
Directions:
  • Brown meat and vegetables together in large covered pot until meat is no longer pink and vegetables are tender. If meat is very fatty, you may drain off/sop up some of the extra fat.
  • Add in the remaining ingredients (except the pasta) and cook uncovered on medium-high for about 10-15 minutes or until the sauce has thickened somewhat. If it is too bubbly, keep lid on partly so moisture can still escape. 
  • Cook pasta according to directions and then drain, adding some of the sauce to mix with the pasta and flavor it prior to serving. Serve with parmesan/romano cheese and a little oregano sprinkled on top.


Thursday, January 30, 2014

Sour Cream Apple Pie


This pie is a wonderful mix of a custard pie with an apple pie and is one of my new favorites! In our family, my mom's apple pie is a must at every winter family dinner. Recently when I had an overabundance of apples, I went through my recipes to look for something different to try and found this recipe that my mom gave me years ago but I had never gotten around to making. I am SO GLAD I finally tried it because it is a real keeper! Since I made the Impossible Pie some time ago and discovered a new-found love of custard pies and all the different ways to work custards into desserts, this pie was right up my alley-- and not that difficult. 

unbaked pie with custard and apple before crumb topping was added

Finished pie
Serves: 8
Ingredients:
  • 1 unbaked 9-10 inch pie crust
  • 2 eggs
  • 1 cup sour cream
  • 1/2-3/4 cup sugar, depending on sweetness of apples
  • 1/4 tsp salt
  • 2 Tbsp flour
  • 1 tsp vanilla extract
  • 1/4 tsp nutmeg
  • 3 cups chopped apples
Topping:
  • 1/3 cup brown or white sugar- or a mix (I used all brown)
  • 1/3 cup flour
  • 3/4 tsp cinnamon
  • 1/3 cup cool butter
  • 1/3 cup crushed nuts (walnuts or pecans work well)
Directions:
  • Preheat oven at 375 degrees F.
  • Chop apples and set aside.
  • Prepare unbaked pie crust in pie pan.
  • Combine eggs, sour cream, sugar, salt, 2 Tbsp flour, vanilla and nutmeg and stir until smooth. 
  • Add in apples and pour into the prepared unbaked crust.
  • Bake for 15 minutes. Meanwhile combine topping ingredients using a fork to cut the butter into other ingredients until it is combined into pea-sized clumps.
  • Sprinkle over top of pie when finished with 1st 15 minute bake and bake for another 20-25 minutes or until filling is set when you lightly jiggle pie. 
  • Cool completely and serve alone or with whipped cream, ice cream or caramel syrup. Refrigerate leftovers.
Adapted from a Taste Of Home recipe.


Monday, January 27, 2014

CranApple Deep Dish Tart


This delicious combination of apple pie and apple crisp are worth the little extra effort and is the perfect autumn and winter dessert. I made this recipe and was going to share it with everyone this past fall but a lot has been happening over the past few months. My husband went through major surgery (having part of his pancreas removed), which took a long time to recover from-- but we are thankful that it was not cancerous. Now that everything is settling down, I hope to get back to sharing a few recipes that I have enjoyed lately.

I had an inspiration for this recipe when I was making an apple dessert and couldn't decide if I wanted to make apple pie or apple crisp. Since then, I have seen a number of apple pan pie recipes but nothing quite like this. The great thing about this recipe is that you can substitute many other fruits for the cranberries, fresh or dried. If you use dried fruits, plump them up some by covering them with water and heating them for about 5-10 minutes. Of course, this dish is just asking for a scoop of vanilla ice cream, too! Since I used cranberries, it is a little tart. So if you like your dessert very sweet, increase the brown or white sugar.

Serves: 6-8

Ingredients:
  • Single unbaked pie crust pastry for 10 inch pie
  • 3 pounds apples, peeled, cored and sliced
  • 1/3 cup brown sugar
  • 3 Tbsp white sugar
  • 1 ½-2 tsp apple pie spice
  • 2 Tbsp minute tapioca
  • 3 Tbsp water
  • 2 cups or ½ bag of cranberries, fresh or frozen (or may use 1 cup dried craisins) 
  • Topping:
  • ¾ cup brown sugar
  • ¾ cup flour
  • ¾ cup rolled oats
  • 1 tsp cinnamon
  • 5 Tbsp butter
  • 2 Tbsp oil
  • 1/3 cup chopped nuts
Directions:

1. Roll out the pie crust to fit 8x8 or 9x9 inch pan and spread out in pan.
2. In a large bowl, combine apples, sugars, spice, tapioca, water and cranberries. Put mixture in pie crust.
3. Prepare topping by mixing dry ingredients and cutting in the butter, adding the oil until mixture clumps together. Put topping over the apples and fold the edges of the pie crust over top of the sides of the pie.
4. Bake at 350 degrees for approximately 40-50 minutes or until the pie is bubbling and apples are tender.
5. May drizzle with caramel sauce or glaze made of 1 cup powdered sugar, 2 Tbsp milk and 1/8 tsp cinnamon and/or top with whipped cream or ice cream.


Saturday, December 14, 2013

Eggnog Pancakes


These pancakes are the best! ....at least that is what my kiddos said. 'Tis the season for all things eggnog and since we needed to use some up and it was time for the weekend pancakes again, I decided to tweak one of my favorite pancake recipes to include eggnog. I added cinnamon chips, but there are a number of other things you might add in to take it to another level- like orange zest and chocolate chips. Have fun experimenting with these!

Serves 4
Ingredients:
  • 1 1/4 cups all purpose flour
  • 1 1/2 tsp baking powder
  • 1 tsp baking soda
  • 1/4 tsp salt
  • 1 1/4 cups eggnog (or liquid of choice)
  • 1/4 cup oil or butter
  • 1 tsp vanilla extract
  • 1/4 cup sugar
  • 1 large egg
  • 1 1/2 Tbsp lemon juice or juice of 1/2 lemon
  • cinnamon baking chips
Directions:
  • In a large bowl, combine milk, oil and vanilla extract. Stir in the sugar. 
  • In a small bowl or liquid measuring cup, mix together egg and lemon juice.
  • Add the dry ingredients and egg mixture to the liquids and stir only until largest lumps are mixed in.
  • Allow to rest for 10-15 minutes- you may start cooking right away but the pancakes made from the batter that has set is a little fluffier.
  • Preheat griddle to medium-high and use butter or coconut oil to oil the surface. Pour out approximately 1/4-1/3 cup for each pancake and sprinkle the baking chips over each pancake as quickly as possible so the pancake cooks up and around the chips.
  • When each one is starting to bubble and the bottom edge is golden brown, flip it over and cook for an additional couple minutes or until golden brown.
  • Butter each pancake while still warm and serve with syrup or your choice of toppings.
  • If you are making a large batch, you can keep them warm by placing them on a wire rack inside of a baking pan and put in the oven at the oven's lowest setting until serving.